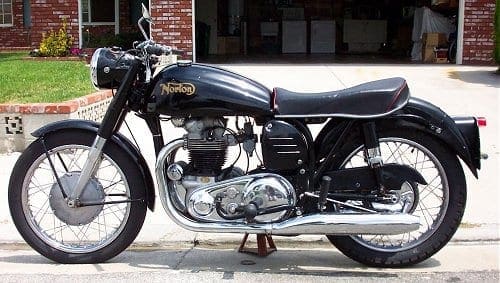
Wherein 50 years of steel pounding on aluminum gives Jim Algar, our Californian correspondent, a hole in his head… and a headache!
Up until 1954, Norton twin engines used a cast iron cylinder head. In 1955, they changed to aluminum. Remember that fact; we’ll come back to it in a moment.
With the Dominator’s engine more or less together (see previous chapters), it was time to turn my attention to the cylinder head. Visually, it had always looked fairly good (for a 50-year-old piece of kit) but it was time to start pulling it apart. Prominently featured in this process, according to all the manuals, would be a special tool: a rocker spindle extraction tool. These steel spindles, on which the rockers ride (rock?), are meant to be a tight press fit in their cylinder head holes, so much so that the aforementioned tool is necessary to get them out, and upon rebuilding they will need to be drifted in using a suitable drift tool and some persuasive words.
I don’t possess this requisite extraction tool, but decided that I could at least begin the teardown to expose the ends of the spindles while I decided where I could source the tool most conveniently (and economically.) So off came the spindle end cover plates. There are two plates at the outer end of each of the four spindles; the inner plates of the pair have two projections on their inner surface that fit a notch on the end of the spindles to keep them from rotating, not that they would if they’re properly tight in their holes.
Once the plates were indeed off, I could see the notched and internally threaded (for the extraction tool) end of the spindles. I put the end of my pinkie finger in the end of one, and… whoa, what’s this?
I can turn it just with the end of my finger! This should not be.
And wait… what’s happening now?
Why, the spindle is coming out of the head with the gentlest tug from the end of my finger. Have I grown an extraction tool on the end of my digit? No, I don’t think so.
|
|
Random Dominator Bits on eBay.co.uk |
So I try the same with the other three spindles… and damn if they don’t all slide out of the head with just a gentle tug from my fingers. I’m getting that sinking feeling, but things are about to go from worrisome to worse. The two intake rocker spindles and the right hand exhaust one, though they now are just a slip fit into the head, are at least secure once in, but the left hand exhaust spindle, after fifty years of pounding away, has severely ovalized [I love the way Americans creationalize new word-ifications. RM] its holes and, when fully inserted in the head, can be wiggled up and down a good eighth of an inch.
So is this a cylinder head I’m holding in my hands, or just a big chunk of aluminium scrap?
What to do, what to do? Well, if you’ve been plowing through previous chapters of this little ‘missive mechanique’, then you know what I’m going to do; that’s right, a phone call to Norvil! I have them programmed on speed dial (literally; no joke!), so I’m soon talking to Les Emery (who at this point would probably be surprised at not getting a monthly transatlantic phone call from me.) His answer to my anguished question, ‘Can this be repaired?’ is what I’ve come to expect from Les: ‘Yes, we can fix that; we do it all the time.’
They’ll re-drill the holes and install bushes, he says-they have all the necessary fixtures and tools-and then he explained that the problem in cylinder heads of my particular vintage is common. When Norton made the switch from cast iron to aluminum for their cylinder heads (told you we’d get to that), they carried on with the finish machining steps as before the switch, drilling all holes the same size, etc. However, aluminum expands more when hot than does cast iron, so the holes expanded when the head got hot, leaving the spindles looser than they should have been, with the end result just what I’ve discovered in my cylinder head. After a couple of years, according to Les, the light dawned, and Norton changed their machining of the heads. So only those couple of years, say 1955 to 1957 or so, tend to exhibit this problem. Well, lucky me, with my 1956 Dommi!
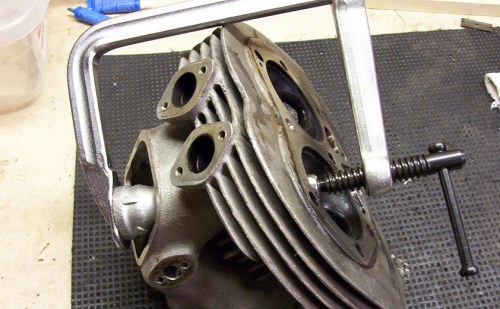
 So I strip the head of the rest of the bits and bobs. The valves don’t look too bad, but I’ll replace them anyway. The guides are definitely worn; in fact, one of them is missing a chunk out of its lower end. Would it surprise you that this is the guide that lives under the rocker spindle with all the ‘wiggle’? No, didn’t think so. So the cylinder head goes into a box and off to Staffordshire. In addition to the required repair, I’ll have it treated to new guides, freshened-up valve seats and a beautifying bead blast while it’s there.
 In the meantime, I can ponder the puzzle of my particularly problematical pushrods. I’ve inherited a mixed set; two of them (one intake and one exhaust) are unmistakably original, being the thin steel type; the other two are of the later, alloy type. According to Roy Bacon’s Norton twin book, they went from steel to aluminum in 1957, with a further change in 1961 to the fatter, barrel-shaped aluminum ones that I’m looking at.
I’m left wondering whether there’s a connection with the pounded out rocker spindle and the fact that two (but only two) of the pushrods were replaced at some point. But since I did not note during teardown which pushrods came out of which side, I’ll never know. The question becomes, then, do I slap my mix-and-match set back in, or do I source a couple of new ones to at least make them all the same? And do I get two of the older steel ones (if they can, in fact, still be had) or go with aluminum for a newer set. Newer, older, forward, backward, original or not original… decisions, decisions. This one might require a quaff or two of a bracing beverage to aid the decision-making process.
I can at least at this point get on with the joining of the engine and gearbox as one unit, courtesy of the mounting plates. I’ve planning on taking the paint off them with some truly nasty paint stripper from my local DIY – nasty enough that it’s a wonder our EPA hasn’t banned it, to protect ourselves from ourselves (nanny state reference). It’s all ‘rubber gloves in a well-ventilated workspace’ and ‘contains chemicals known to the State of California to cause cancer’ warning stickers… so I’ve bought myself a pair of rubber gloves in a fetching shade of electric blue, and made a mental note not to inhale. Nasty stuff indeed, but undeniably effective, as the paint turns into a sort of wrinkled goo that comes away easily with water and a little brushing.
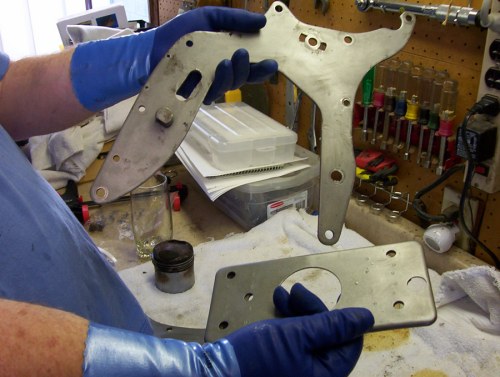
So, clean plates; time for paint. I’ve decided on something called PJ1 Fast Black, available in aerosol cans and describing itself as ‘Gloss Black, Porcelain-Hard, Epoxy Paint.’ I’m hoping this proves suitable for some of the smaller pieces of the bike, like the mounting plates, so that I can finish them myself while I wrestle with the bigger finish questions about the frame and tinware, namely… professionally done in paint or powdercoat?
PJ1 paints are sold as motorcycle-specific, with various colors and formations for different uses, such as frames, engine parts, high-temperature exhaust bits, and so forth. Applying it in thin coats, with ten or fifteen minutes between each coat, seems to work best, and I’m pleased with the finished result… at least on the mounting plates, which are flat and not too large and easy to paint. With the plates finished, I’m able to join the engine – minus its cylinder head, for now – and the gearbox together. Progress!
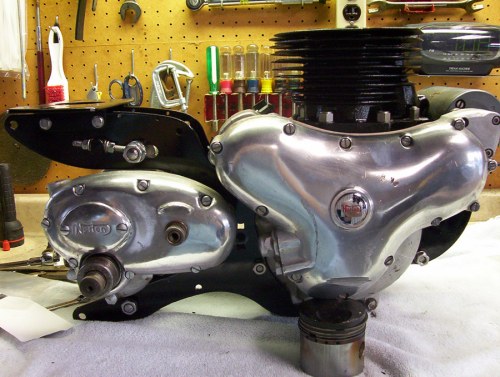
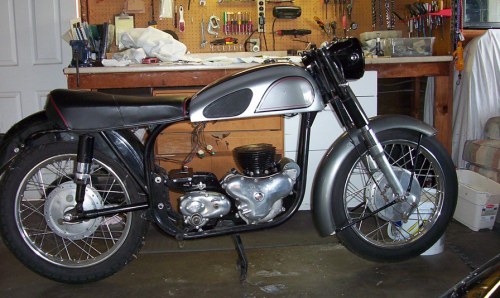
Just for fun – and to convince myself that I might just eventually pull this whole motorcycle rebuild thing off – I decide to trial fit the motor/gearbox assembly into the frame, along with a few other parts that I’ve gathered, like petrol tank, seat and front mudguard. Let me take a side trip here and regale you with the tale of the front mudguard. The one on the bike when I purchased it was not original; it’s much shorter, and shallower, than a correct unit, and I’ve been looking for a replacement for a long time. Original Norton tinware is, as you might expect, a little thin on the ground. Rusty, hacked-about examples appear from time to time, but I wanted something a little better.
A few months back, an original, NOS front Dommi mudguard appeared on eBay, and I found myself in a bidding war with a gentleman from Italy. Desire overcame good sense – for both of us, I think – and we pushed each other to a price that, if I had been the winner (I wasn’t, but then neither was he), I’d be embarrassed to admit to publicly. Lesson learned; patience and a cool head are required.
Recently, another front mudguard was up for auction; this was a pattern part (here, we say ‘reproduction’), but it looked good, and I was able to win the auction at a much more reasonable price. The mudguard subsequently arrived, nicely wrapped, all the way from Jarrow, Tyne and Wear. According to the seller, he’d bought it in 1985 from Armours, also well-known for their silencers (that last a fact that I’ve stored away for future reference).
|
|
Random Nortons on eBay.co.uk |
It’s not absolutely as per original; the mounting holes for the stays are not exactly where they should be, but they do match up with the stays that came on the bike, which are evidently not original either, having obviously been installed at the same time as the short, shallow, non-original mudguard. These are one piece hoop-type stays, one front and one rear, running on the inside of the mudguards; whereas original stays should be separate items, two front and two rear, four in total. So this mudguard might be more of a universal pattern, but it matches well with all the 1956 photo and brochure material I’ve gathered in the course of this effort, seems the right size and shape, and has proper rolled edges (which the first mudguard did not), and, well, it looks ‘right’. It will eventually be painted black, not the silver it came in, as per original.
Anyway, with the various bits perched in and on the frame, it’s beginning to resemble a motorcycle, and I’m encouraged. I’m also sore; manhandling the engine and gearbox about and into the frame, all at floor level, has not done my back any good. I’ve decided that while I’m waiting for my cylinder head to be returned I’m going to go out and look at a few hydraulic lifts, so that my rebuild from this point on can be a truly, ahem, uplifting experience. (Ooh… sorry.)
Until next time…
