Wherein small bits and lumps come together to form a recognisable larger lump… all without major problems. Puzzling. Jim Algar wonders if he should start to worry?…
The bike has been sitting untended in my garage for a depressingly long period of time. There was, of course, the wait while Norvil tended to my crankshaft (see Chapter 5), but there were also all too many non-bike matters to tend to, including a bout of health problems (now thankfully past) and other mundane concerns. But finally a large parcel was unceremoniously dumped on my doorstep (not big on ceremony, is our postal service). As glad as I was of this, I suspect my neighbors were even more glad, since I had taken to dealing with the days and weeks of frustrating non-bike-time by breaking out my Fender Telecaster guitar at all hours and playing it loudly if none too expertly. Whanging out power chords like a demented Pete Townsend is very therapeutic, if not exactly neighborly.
But now I have parts to play with. Norvil has done its usual masterly job of the requested tasks. The crankshaft end thread now accepts the pinion nut/worm drive without complaint. I also sent them my cylinder for a re-bore, bead blasting and refinishing. Time to pick up the spanners.
|
I have had the crankcase together and apart so many times now that it’s becoming second nature. First task was the crank bearings; I had Norvil include a couple of Superblends with my order. These are well-known in the Norton community. In 1972, Norton introduced its Combat engine, which unfortunately lived up to its name by turning itself into shrapnel before the warranty period was even half over. Chief among the problems was the crank bearings; up to this point, Norton had used a ball bearing on the drive side and a roller bearing on the timing side of its twins, but the Combat was capable of power levels that were pushing a standard ball bearing’s ability to cope. So Norton went with a roller bearing on both ends of the crank. Now, a roller can cope with more load than a ball bearing, all things being equal, but it has one drawback; it is less forgiving of misalignment and crankshaft flex than is a ball bearing. And the Combat engine would flex its crank, especially at high rpm, leading to embrittlement of the rollers and scoring of the bearing races with resulting nastiness of a rotating kind. It was a financial and public-relations nightmare for Norton, and was only cured when they went to the so-called Superblend bearing, which have rollers that are the tiniest bit barrel-shaped, allowing for some normal crank flex while still retaining their superior load-bearing qualities. |
Random Nortons on eBay.co.uk |
Now, you have every right to ask: does a Dominator, which is going to be only gently ridden at all times, really need these bearings? The answer, of course, is no. But I’ll rest easy knowing that my bottom end is as bullet-proof as I can make it. (Insert obligatory ‘my bottom end’ joke here).
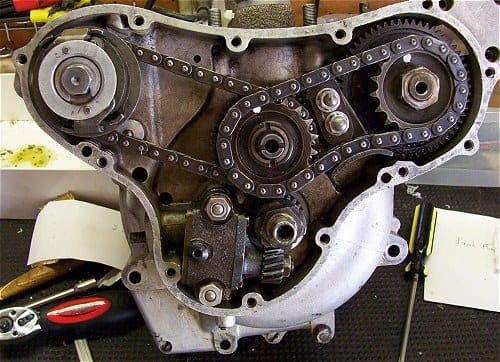
With the crankcase buttoned up, it was time to turn my attention to the timing case, home of all the whizzy/whirly bits. (Side note here: I am aware that ‘whizzy/whirly’ is not a pukka engineering term, but when you consider that a running Dominator has a timing case containing no less than ten gears, four sprockets and two chains, all moving in various directions at considerable speed… I rest my case).
Everything went in smoothly, and it was only as I was about to install the oil pump that I noticed something that had escaped my attention during my initial teardown. I have previously mentioned (Chapter 3) the grinding marks in the timing side of the crankcase, obviously caused by a magneto chain allowed to go so slack that it flailed away at the soft aluminum of the crankcase. What I hadn’t realized is that the chain did a fairly impressive job on the much harder steel body of the oil pump, leaving two parallel, deep grooves in the pump body.

Something of a mystery, that; while the crankcase, being aluminum, could have been scored fairly quickly, the steel oil pump body would have required some significant amount of time to have ‘earned’ its stripes. And would the bike even have run with a magneto chain that slack, given what it must have done to the timing? I can only surmise that a previous owner just kept adjusting the timing, again and again, without ever stopping to wonder why it was going so completely out of whack.
Still, no harm, no foul. The damage is cosmetic, and affects the operation of the pump not at all, so I’ll put the pump back in proudly wearing its battle scars for one and all to see. Or actually, for no one to see, when the timing cover is back in place. Out of sight, out of mind. So with everything in place and adjusted, it’s on to the next project; pistons and barrel.

A shiny new set of pistons accompanied the cylinder barrel on its return, but hang on a minute… what’s this? They don’t look like the pistons that came out of the engine. The new ones are flat-topped; the old ones were considerably domed. And the new wrist pins feel excessively tight in the rod bushes. So it’s on the phone to Les Emery (who is getting used to hearing ‘Hello, Les, it’s Jim from California’). Not to worry, says Les; the flat-topped units are correct. Some previous owner had ‘needlessly’ (Les’s opinion) opted to up the compression ratio, so I’m happy to hear that I’m taking things back to original. And the tight fit is common with new parts, he says, and a quick pass or two at the bushes with an adjustable reamer (which, way hey, I just happen to own) would have things right… and right he was.
Time now to fit the re-bored and re-finished barrel (the usual lovely level of work from Norvil) down onto the pistons. This, of course, requires special precision tools; two Jubilee clips and a small length of lumber. Cost: $4 (though over here, one asks for ‘hose clamps’: saying ‘Jubilee clips’ gets you a blank look down at the local DIY center.) But first there’s a paper gasket that goes under the barrel, which fits… none too well. Is this a pattern part problem (not sure of the source of the gasket set) or is it an age problem?

All papers have a grain, and will in time shrink, more in the direction of the grain than across it. Since the gasket seems to fit fine side to side but comes up short in lining up its holes with the studs in the fore and aft direction, I’m inclined to suspect shrinkage. After all, there’s no way to know how old this gasket set really is, but odds are it wasn’t punched out last week. A little work with an X-Acto knife to elongate the holes slightly in the necessary fore/aft direction has the gasket laying flat without tears, or tears (wordplay!). There’s an oil return hole in the crankcase that must match up with the corresponding hole in the gasket, which it does… almost. X-Acto, please, nurse.
Time for the barrel. What would seem the most daunting part of this operation, lowering the barrel onto the pistons, in fact turns out to be the easiest, as it smoothly and obligingly settles over the rings; off come the Jubilee clips, away goes the length of lumber, and the barrel settles over the crankcase studs as nice as you please. Well, we have to get lucky once in a while, don’t we? On go the lovely stainless steel nuts, and I quickly position the timing cover and cylinder head for a ‘progress to this point’ photo. Goodness, this is actually starting to resemble a motorcycle engine. I may have to treat myself to the fish and chips at the Rose and Crown, our ‘authentic’ British restaurant here in Santa Clarita.

So what’s next? Why, the cylinder head, of course. Which means valves and springs and guides and rockers… and no doubt further adventures of the mechanical kind. Until next time…
|
|
Dominator Stuff on eBay.co.uk |


