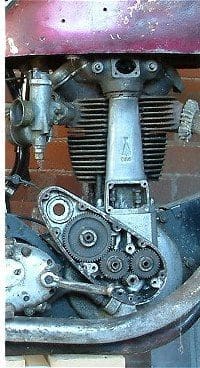
Getting into the engine: the time has come for Phillip Rashleigh to take apart the crankcases and discover what horrors lurk within…
Enjoy more RealClassic Magazine reading every month.
Click here to subscribe & save.
Finally, I decided that the time had come to take the crankcases apart. The bike had come with the barrel and head only resting on the cases but the crank and timing gear were all in situ.
So it went onto the operating table (or the Black & Decker Workmate as some of you may know it…) Where to start? The timing side was the most obvious choice: off with the cover — noting the crack in it — and then into the gears and cams. All came off without too much fuss and the crank pinion popped off with the help of a couple of tyre levers (ahem).
On the primary side the spring, sprocket and nut put up a valiant but short lived resistance and then I could tackle the cases. I have built, re-built and repaired many engines of various sizes over the last 17 or so years so I was a little surprised to note that the whole plot was held together by just three bolts, with only the engine mounting studs offering a supporting role.
So it was off with these, and then followed a quick tap with a ½lb ball pein (I do not own a Thor King of Hammers„¢) and brass drift and the cases were split. This was the time, I must admit, for a little surprise — the size of the fly wheels!
|
This is a serious bit of heavy engineering only tempered by the thought of the 500cc component being heavier. I made a mental note to talk to Roy about lightening this lot; surely it would help? Anyone out there have any thoughts on this? After lifting the lot free, I took stock of the components. The big end must have been replaced as some point, as its nut securing washer’s retaining screw was a little butchered. The big end and mains seemed OK but will be replaced as a matter of course. Off came the piston and the little end looked very pitted so I guess this will also require a new item. I know that the bike was retired from active service before its journey to Cornwall but the sand and grit I keep finding over the outside of the engine is also in the thick black oil left in the sump. So it was cleaning time – a new spray bottle of Muck Off and kitchen towel saw the primary side clean in about an hour. The clean surfaces looked ok, with no cracks or other areas to cause concern. However, the amount of red sealing compound confirmed again that the engine has been split in the past. |
Random B31 on eBay.co.uk |

I move onto the timing side and a further hour sees this clean and the oil pump removed. A quick examination shows that this is seized which does worry me a little as it is full of oil. However the drive spigot is intact so the seizure must (I hope) be post-retirement… rather than the cause of it.
One final wash off and drying, then a quick-going over with some wire wool shows that the cases are in good condition. I will take the time to run all the threads through with plug taps, counter-sink all the threaded holes and take time to clean up and remove any burrs from the mating faces and the throat. I had planned to polish the inside of the cases to reduce windage on the rotating crankshaft, however after talking to a few racing type bods this seems like a bad idea (the smooth inner surface would appear to reflect heat back into the engine making it run hotter, so this will be a sprint bike modification).

One last job is to mount the cases back into the frame and mount the barrel and head on top. Yep it looks good and I can’t wait to get the engine together and fire her up for the first time…


